Wednesday, 11 July 2018

Couch installation with source code

Step 1

Install required packages for couchdb for manual installation.

yum install autoconf autoconf-archive automake curl-devel help2man js-devel libicu-devel libtool perl-Test-Harness -y

if any fails then install epel install that failed dependencies.

yum install epel-release

Step 2

Download the erlang  rpm package cause source is not working perfectly to me so i decide to install rpm.

wget https://packages.erlang-solutions.com/erlang/esl-erlang/FLAVOUR_1_general/esl-erlang_19.3.6-1~centos~6_amd64.rpm

now run the below command to start install. 

Note: couchdb is required 20 or below erlang 

rpm -Uvh  esl-erlang_19.3.6-1~centos~6_amd64.rpm

Step 3

Now download couchDB from the source

wget https://archive.apache.org/dist/couchdb/source/2.1.1/apache-couchdb-2.1.1.tar.gz

untar the package with following command

tar xzf apache-couchdb-2.1.1.tar.gz

after that goto that directory and start configure it. 

Note: there is no need of prefix or anything else in above 2.0 version it will load the package in rel in the configuration folder.

 cd apache-couchdb-2.1.1

 now run the command below mention to configure.

./configure

then run make

 make

and then run make release it will do the mail installation.

make release


if you  face any issue on this just install couchdb with yum and try it will work.

now couchdb installed successfully. we can move the directory to any where to start.

mv apache-couchdb-2.1.1/rel/couchdb /opt


start the couchdb from bin directory with below command

./couchdb &

Step 4

If we have multiple couchdb on same server then we need to made one change vm.args in couchdb/etc location. I have mentioned it below.

# Multiple CouchDBs running on the same machine can use couchdb1@, couchdb2@,
# etc.
-name couchdb1@127.0.0.1


after that try to run the both couchdb in same server.

Step 5

For create noramal user we can use the below details.

click the users in database like screenshot below


Then click Click Document


It will show like below screenshots


and add the below details on it


{
"_id": "org.couchdb.user:readonly",
"name": "readonly",
"password": "readonly",
"roles": [],
"type": "user"
}
then add the users to database in permission tab.
Tuesday, 17 April 2018

CouchDB replication in command line

Here I have mentioned the command line replication method only.

curl -X POST -d ‘{“source”:”https://username:password@sourceIP:6984/databasename”,”target”:”http://username:password@targetIP:5984/databasename”}’ https://username:password@sourceIP:6984/_replicate -H ‘Content-Type: application/json’

We can you http and https which we required in that filed.

Tuesday, 10 April 2018

How to install GUI in rhel 7

Step 1

Need to check the available groups of YUM with following command.

yum group list

Loaded plugins: langpacks, product-id, subscription-manager
This system is not registered to Red Hat Subscription Management. You can use subscription-manager to register.
There is no installed groups file.
Maybe run: yum groups mark convert (see man yum)
Available environment groups:
Minimal Install
Infrastructure Server
File and Print Server
Basic Web Server
Virtualization Host
Server with GUI


it will show result like this. We need GUI it will listed in that group.

Step 2

Now need to install the GUI group with following command.

yum groupinstall 'Server with GUI' -y
it will install all the required dependencies and packages.

After installation complete just check the targets. In rhel 7 run levels called as targets.


systemctl get-default

it will show the result as below

multiuser.target

Now modify the targets to graphical.target, for that do the following steps.

systemctl enable graphical.target --force

rm /etc/systemmd/system/default.target

ln -s /usr/lib/systemd/system/graphical.target /etc/systemd/system/default.target


Now verify the current target

systemctl get-default

it will show like

graphical.target

Step 3

Reboot the server and check.


Monday, 19 March 2018

How to install Joomla in rhel 7

For internal knowledge sharing the local blog server is installed and configured.

Step 1

If it's a fresh server then update once.

yum update -y

then start installed required dependencies packages for that.

yum install httpd mysql-server php php-mysql php-curl php-gd php-pear php-memcache php-pspell php-snmp php-xmlrpc -y

Now start the service and enable it to start automatically in reboot.

systemctl start httpd ; systemctl enable httpd

systemct start mysqld ; systemctl enable mysqld

Step 2

Configure the mysql with following command with your requirement.

mysql_secure_installation

then create a database and user in mysql

mysql -u root -p

create database joomla;

create user joomla@localhost identified by 'Joomla@123';

grant all privileges on joomla.* to joomla@localhost;

flush privileges;

exit

Step 3

Download the package of Joomla from this link

 wget http://joomla addresss/file.zip

now unzip the files to /var/www/html

unzip Joomla_3-8.6-stable-full_package.zip -d /var/www/html/

Now change the owner to apache for all the files.

chown apache:apache /var/www/html/ -R

chmod -R 775 /var/www/html/

Now restart the httpd service.

systemctl restart httpd

Step 4

Open the url in your browser

http://192.168.0.1


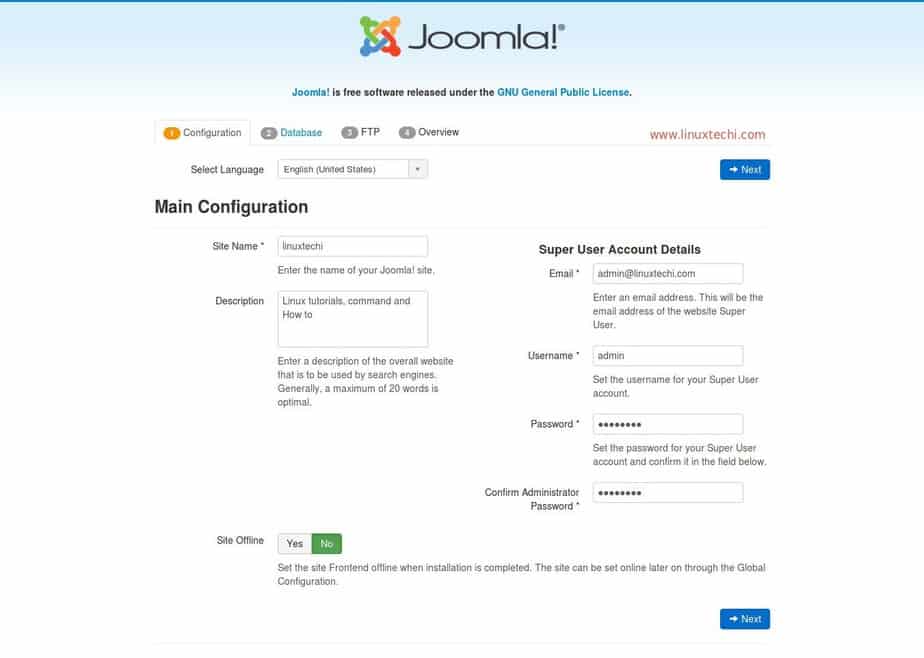
 Fill all the required and click next


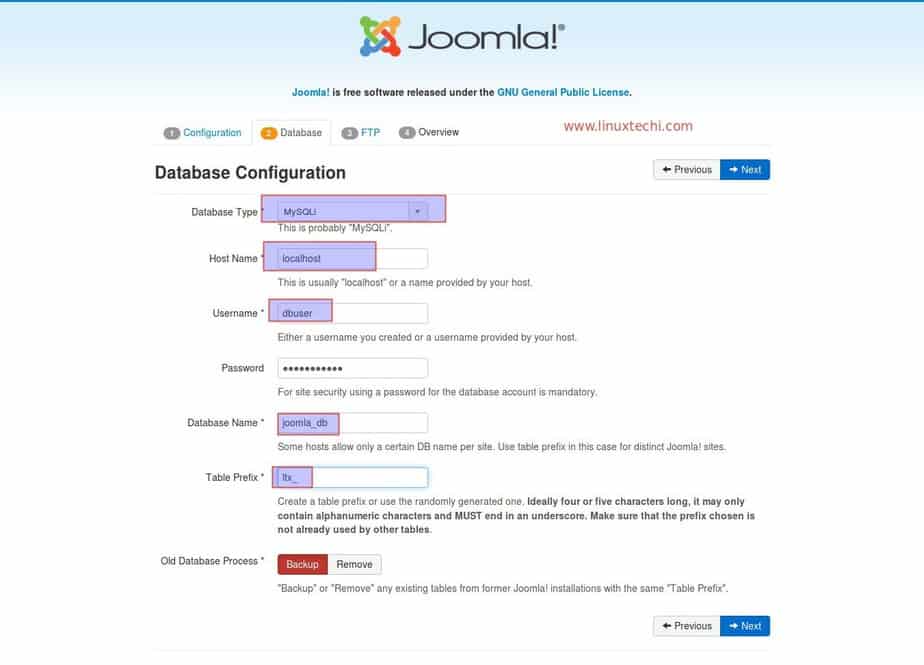
 Fill the DB details and click next


 If required fill or else click next


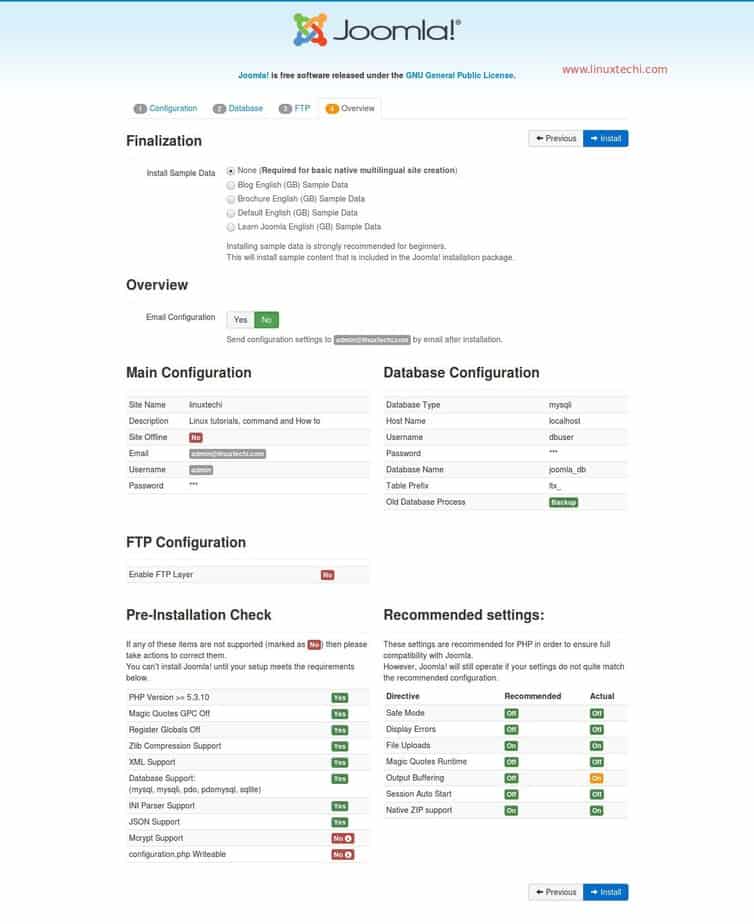
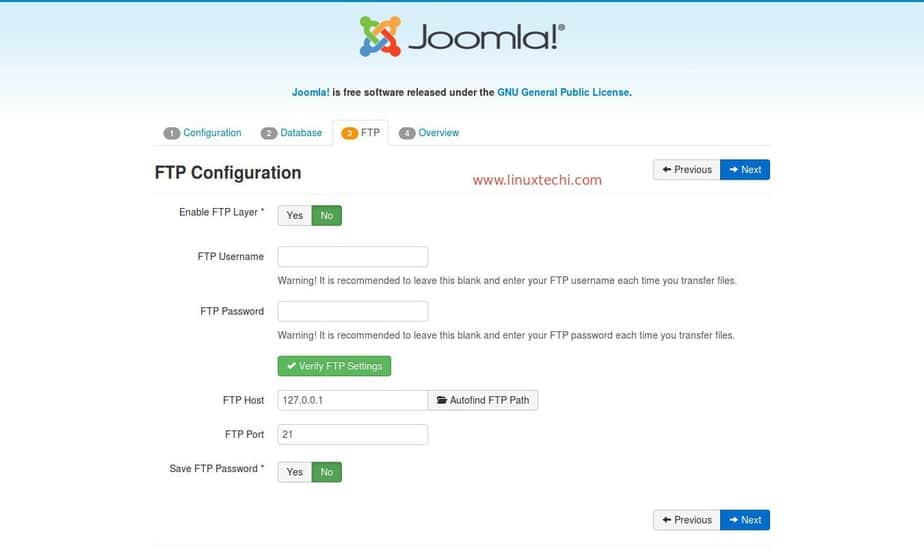
Now if you want sample data click any of that your choice or else click install


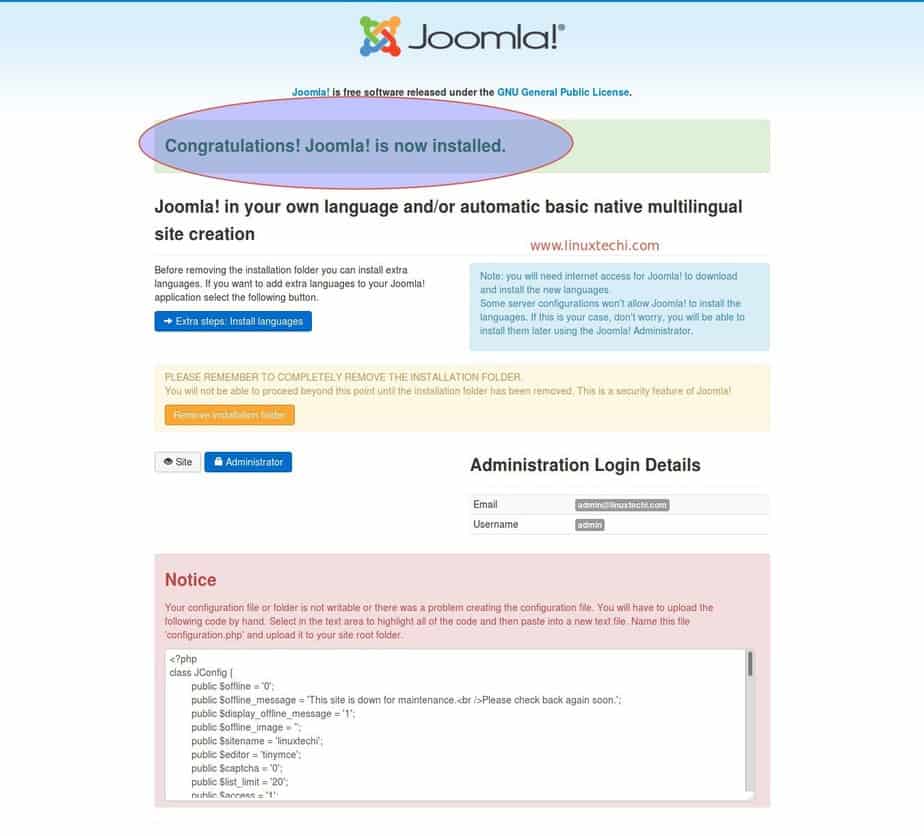
After this click remove installation folde and click Administrator button that shows in locked symbole.

That's all you can start using your blog.

Tuesday, 27 February 2018

How to install java in rhel/centos

Step 1

Download the required java version from below java archive link.

for 6

JAVA 6

for 7

JAVA 7

for 8

JAVA 8

Step 2

Extract the package in =to the required directory.

tar -xzf jdk-XUxx-linux-xxx.tar.gz

Step 3

Install the java with alternatives.

go to the java directory that you have extracted.

cd /opt/jdkx.x.x_xx/

install with below command

alternatives --install /usr/bin/java java /opt/jdkx.x_xx/bin/java 2

now select that which you want to be default to work with below command

alternatives --config java

example output

There are 4 programs which provide 'java'.

  Selection    Command
-----------------------------------------------
*  1           /opt/jdk1.6.0_xx/bin/java
 + 2           /opt/jdk1.7.0_xx/bin/java
   3           /opt/jdk1.8.0_144/bin/java
   4           /opt/jdk1.8.0_xxx/bin/java

Enter to keep the current selection[+], or type selection number: 

In this java has been installed still we need to setup javac and jar command with alternatives.

Step 4

With the following command we can install jar and javac

alternatives --install /usr/bin/jar jar /opt/jdkx.x.x_xx/bin/jar 2

alternatives --install /usr/bin/javac javac /opt/jdkx.x.x_xx/bin/javac 2

alternatives --set jar /opt/jdkx.x.x_xx/bin/jar

alternatives --set javac /opt/jdkx.x.x_xx/bin/javac

Now check the java version with below command

java -version

Step 5

Set JAVA home in to the bash_profile

export JAVA_HOME=/opt/jdkx.x.x_xx

export JRE_HOME=/opt/jdkx.x.x_xx/jre

export PATH=$PATH:/opt/jdkx.x.x_xx/bin:/opt/jdkx.x.x_xx/jre/bin

that's all now you can use java.

How to install Apaceh ant in linux

What is Apache Ant?

ANT stands for Another Neat Tool. It's an open source tool for automating java program build process. Ant's build files are written in XML and they take advantage of being open standard, portable and easy to understand.

It simplify the developers works like compiling the code, packaging the binaries, deploying the binaries to the test server, testing the changes and copying the code from one location to another to simply automate it.

Now we are going to see how to install it.

Step 1

Download the package that you are required from mentioned link below.

 https://archive.apache.org/dist/ant/binaries/

Step 2

Extract the package to required location.

cd /opt

tar xzf apache-ant-x.x.x-bin.tar.gz

now rename the directory 

mv apache-ant-x.x.x ant

Step 3

Setup HOME directory in environment 

sh -c 'echo ANT_HOME=/opt/ant >> /etc/environment'

now link the binary 

ln -s /opt/ant/bin/ant /usr/bin/ant

Now check the ant version with below command

ant -version

sample example above command result


Note Java is need to installed o this server.
 

Wednesday, 24 January 2018

How to install Fail2ban in rhel 6 & 7

What is fail2ban?

Fail2ban works by scanning and monitoring log files for selected entries then bans IPs that show the malicious signs like too many password failures, seeking for exploits, etc.


1. Install Fail2Ban


For RHEL 6


rpm -Uvh http://dl.fedoraproject.org/pub/epel/6/x86_64/epel-release-6-8.noarch.rpm


For RHEL 7


rpm -Uvh http://dl.fedoraproject.org/pub/epel/7/x86_64/Packages/e/epel-release-7-11.noarch.rpm

yum install fail2ban


2. Copy the Configuration File


The default fail2ban configuration file is located at /etc/fail2ban/jail.conf. The configuration work should not be done in that file, since it can be modified by package upgrades, but rather copy it so that we can make our changes safely.


We need to copy this to a file called jail.local for fail2ban to find it:


cp /etc/fail2ban/jail.conf /etc/fail2ban/jail.local


3. Configure defaults in Jail.Local


The first section of defaults covers the basic rules that fail2ban will follow to all services enabled for fail2ban that are not overridden in the service's own section.. If you want to set up more nuanced protection for your server, you can customize the details in each section.


You can see the default section below.


[DEFAULT]

# "ignoreip" can be an IP address, a CIDR mask or a DNS host. Fail2ban will not
# ban a host which matches an address in this list. Several addresses can be
# defined using space separator.
ignoreip = 127.0.0.1

# "bantime" is the number of seconds that a host is banned.
bantime  = 3600

# A host is banned if it has generated "maxretry" during the last "findtime"
# seconds.
findtime  = 600

# "maxretry" is the number of failures before a host get banned.
maxretry = 3


4. Add a jail file to protect SSH


Although you can add this parameters in the global jail.local file, it is a good practice to create seperate jail files for each of the services we want to protect with Fail2Ban.


So lets create a new jail for SSH with the vi editor.


vi /etc/fail2ban/jail.d/sshd.local


In the above file, add the following lines of code:


[sshd]
enabled = true
port = ssh
action = iptables-multiport
logpath = /var/log/secure
maxretry = 3
bantime = 3600


5. Restart Fail2Ban


service fail2ban restart


iptables -L


Check Fail2Ban Status


Use fail2ban-client command to query the overall status of the Fail2Ban jails.


fail2ban-client status


You can also query a specific jail status using the following command:

fail2ban-client status sshd


Manually Unban IP Banned by Fail2Ban


If for some reason you want to grant access to an IP that it is banned, use the following expression to manually unban an IP address, banned by fail2ban:


fail2ban-client set JAIL unbanip IP


eg. Unban IP 192.168.1.101, that was banned according to [ssh-iptables] jail:


fail2ban-client set sshd unbanip 192.168.1.101

Tuesday, 2 January 2018

How to take backup and restore svn repository


Step 1 

Create Dump from SVN repo

svnadmin dump /pathname/repo > /backup/svn/repo.dump

Compress backup svn to Gzip

For this we can compress the backup to and save disk size

svnadmin dump /pathname/repo | gzip -9 > /backup/svn/repo.dump.gz

Step 2

Restore Backup to repo

Create new repository with below command

svnadmin create /pathname/reponew

Now restore the dump to new repo

Before doing restore we need to unzip the dumb backup

gunzip /backup/svn/repo.dump.gz

svnadmin load /pathname/reponew < /backup/svn/repo.dumb

That’s all ……………….

How to take backup and restore data in graylog


Step 1

Graylog Backup Data

First we need to stop all the service of elasticsearch graylog-server

service elasticsearch stop

service graylog-server stop

Step 2

Now we are going to take dump backup from mongodb.

Mongo has content and setting of graylog. Use the below command to take dump backup.

logger -s -i “Dumping MongoDB” mkdir -p /u01/backup-graylogDB mongodump -h 127.0.0.1 -d graylog -o /u01/backup-graylogDB

This one for backup the contents and settings with data.

loger -s -i “Dumping MongoDB” tar -zcf /u01/backup-graylogDB/elasticsearch.tar.gz --directory=/var/lib/elasticsearch graylog

By default graylog indices have 12 gb by compressing it will reduce the size and save disk size.

Step 3

Graylog Restore Data

We need to stop the service like above.

Now untar the compress backup files with below command

tar xzf graylog.dump.tar.gz

tar xzf elasticsearch.tar.gz

Now restore the mongo Database with below command.

mongorestore -d graylog ./graylog

Now move the elasticsearch backup to their path.

mv elasticsearch /var/lib/elasticsearch

Now start the services of elasticsearch and graylog-server

service graylog-server start

service elasticsearch start

That’s all.

Friday, 22 December 2017

Gitlab backup and restore - Simple way

We can easily  take a backup and restore data from gitlab.

Step 1

Taking backup from gitlab

First we need to use the below mentioned command to take a backup.

gitlab-rake gitlab:backup:create

Holding time will depends on your gitlab project size.

If we need skip some files from taking backup then issue the additional lines in that command

gitlab-rake gitlab:backup:create SKIP=db,uploads

it will skip the db and uploads.

Backup data will stored in the default location of gitlab /var/opt/gitlab/backups/ with timestamp and tar format. example

 1973754682_2017_12_22_gitlab_backup.tar

Step 2

Restoring the gitlab data

before starting restore command we have to stop 2 services from gitlab.

gitlab-ctl stop unicorn
gitlab-ctl stop sidekiq

Verify once the status of these services were stoped or not with below command.

gitlab-ctl status

now run the below command to restore.

gitlab-rake gitlab:backup:restore  BACKUP=1973754682_2017_12_22

Now it will ask like screen shot below. Type yes to continue.


then again it will ask question like below screenshot, then typ yes.


that's all it will complete within few min or seconds. 

Now start the services of gitlab with below command.

gitlab-ctl start

now we need to check the gitlab status after restore with below command.

gitlab-rake gitlab:check SANITIZE=true

it will take some time to check after complete the check verify it. 

Now login and check.

That's all......


Helm installation on rhel 9

 You can do install with 2 commands  first one is curl -fsSL -o get_helm.sh https://raw.githubusercontent.com/helm/helm/main/scripts/get-hel...